
The Tunnel That Lost Light II
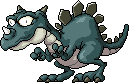
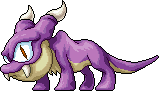
The Tunnel That Lost Light II is a map in Dungeon, Victoria Island. Monsters here are level 40 to 62: Cold Eye, Drake and Wild Kargo.
- Mob types
- 3
- Spawns
- 47
- EXP on map
- 5,737
- Exits
- 2
Map, portals and spawns
Tap a number or letter to see where it goes.
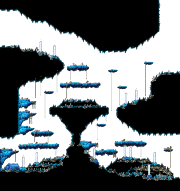
Ways out(2)
- 2 portals
- Right side · lower levelunmarked portal · not tested
You arrive on the left side, lower level.
- Right side · upper level
You arrive on the left side, upper level.
Monsters(3)
Also here
- 5 ladders
- 18 ropes
Minimap from the game files. Positions are from the game files, not tested in Classic World. Portal kinds come from type names in the game files; kinds marked "not tested" have not been checked in Classic World. An unmarked portal has no portal graphic, so the way in may be a door drawn in the scenery.
How to get here
From the nearest towns
From Sleepywood16 maps
- Step 1Ant Tunnel IIn Sleepywood, take4Right side · lower level
You arrive on the left side, upper level.
- Step 2Ant Tunnel IIIn Ant Tunnel I, take2Right side · lower level
You arrive on the left side, upper level.
- Step 3Ant Tunnel IIIIn Ant Tunnel II, take2Right side · upper level
You arrive on the left side, upper level.
- Step 4Ant Tunnel IVIn Ant Tunnel III, take2Right side · upper level
You arrive on the left side, upper level.
- Step 6Dangerous SteamIn Dark Cave, take2Right side · lower level
You arrive on the left side, upper level.
- Step 7Deep Ant Tunnel IIn Dangerous Steam, take2Right side · lower level
You arrive on the left side, upper level.
- Step 8Deep Ant Tunnel IIIn Deep Ant Tunnel I, take2Right side · lower level
You arrive on the left side, middle level.
- Step 9Ant Tunnel ParkIn Deep Ant Tunnel II, take2Right side · lower level
You arrive on the left side, upper level.
- Step 10The Cave of Evil Eye IIn Ant Tunnel Park, take1Left side · lower level
You arrive on the left side, upper level.
- Step 11The Cave of Evil Eye IIIn The Cave of Evil Eye I, take2Right side · lower level
You arrive on the left side, upper level.
- Step 12The Cave of Evil Eye IIIIn The Cave of Evil Eye II, take1Left side · lower level
You arrive on the right side, upper level.
- Step 13The Cave of Evil Eye IVIn The Cave of Evil Eye III, take2Right side · lower level
You arrive on the left side, upper level.
- Step 14Drake Hunting GroundIn The Cave of Evil Eye IV, take2Right side · lower level
You arrive on the left side, lower level.
- Step 15The Tunnel That Lost Light IIn Drake Hunting Ground, take2Right side · upper level
You arrive on the left side, upper level.
- In The Tunnel That Lost Light I, take2Right side · lower level
You arrive on the left side, upper level.
From Henesys20 maps
- Step 1The Road to the DungeonIn Henesys, take9Right side · upper level
You arrive on the left side, lower level.
- Step 2Henesys Dungeon EntranceIn The Road to the Dungeon, take2Right side · lower level
You arrive on the left side, middle level.
- In Henesys Dungeon Entrance, take3Right side · middle level
You arrive on the left side, upper level.
- In Swampy Land in a Deep Forest, take2Right side · lower level
You arrive on the left side, middle level.
- Step 5Ant Tunnel IIn Sleepywood, take4Right side · lower level
You arrive on the left side, upper level.
- Step 6Ant Tunnel IIIn Ant Tunnel I, take2Right side · lower level
You arrive on the left side, upper level.
- Step 7Ant Tunnel IIIIn Ant Tunnel II, take2Right side · upper level
You arrive on the left side, upper level.
- Step 8Ant Tunnel IVIn Ant Tunnel III, take2Right side · upper level
You arrive on the left side, upper level.
- Step 10Dangerous SteamIn Dark Cave, take2Right side · lower level
You arrive on the left side, upper level.
- Step 11Deep Ant Tunnel IIn Dangerous Steam, take2Right side · lower level
You arrive on the left side, upper level.
- Step 12Deep Ant Tunnel IIIn Deep Ant Tunnel I, take2Right side · lower level
You arrive on the left side, middle level.
- Step 13Ant Tunnel ParkIn Deep Ant Tunnel II, take2Right side · lower level
You arrive on the left side, upper level.
- Step 14The Cave of Evil Eye IIn Ant Tunnel Park, take1Left side · lower level
You arrive on the left side, upper level.
- Step 15The Cave of Evil Eye IIIn The Cave of Evil Eye I, take2Right side · lower level
You arrive on the left side, upper level.
- Step 16The Cave of Evil Eye IIIIn The Cave of Evil Eye II, take1Left side · lower level
You arrive on the right side, upper level.
- Step 17The Cave of Evil Eye IVIn The Cave of Evil Eye III, take2Right side · lower level
You arrive on the left side, upper level.
- Step 18Drake Hunting GroundIn The Cave of Evil Eye IV, take2Right side · lower level
You arrive on the left side, lower level.
- Step 19The Tunnel That Lost Light IIn Drake Hunting Ground, take2Right side · upper level
You arrive on the left side, upper level.
- In The Tunnel That Lost Light I, take2Right side · lower level
You arrive on the left side, upper level.
From Perion23 maps
- Step 1Deep Valley IIn Perion, take6Right side · lower level
You arrive on the right side, upper level.
- Step 2Deep Valley IIIn Deep Valley I, take2Middle · lower level
You arrive in the middle, upper level.
- Step 3Deep Valley IIIIn Deep Valley II, take1Left side · lower level
You arrive on the left side, middle level.
- Step 4Perion Dungeon EntranceIn Deep Valley III, take2Right side · lower level
You arrive on the right side, upper level.
- Step 5Deep ForestIn Perion Dungeon Entrance, take1Left side · lower level
You arrive on the right side, upper level.
- In Deep Forest, take3Right side · lower level
You arrive on the right side, upper level.
- In Swampy Land in a Deep Forest, take2Right side · lower level
You arrive on the left side, middle level.
- Step 8Ant Tunnel IIn Sleepywood, take4Right side · lower level
You arrive on the left side, upper level.
- Step 9Ant Tunnel IIIn Ant Tunnel I, take2Right side · lower level
You arrive on the left side, upper level.
- Step 10Ant Tunnel IIIIn Ant Tunnel II, take2Right side · upper level
You arrive on the left side, upper level.
- Step 11Ant Tunnel IVIn Ant Tunnel III, take2Right side · upper level
You arrive on the left side, upper level.
- Step 13Dangerous SteamIn Dark Cave, take2Right side · lower level
You arrive on the left side, upper level.
- Step 14Deep Ant Tunnel IIn Dangerous Steam, take2Right side · lower level
You arrive on the left side, upper level.
- Step 15Deep Ant Tunnel IIIn Deep Ant Tunnel I, take2Right side · lower level
You arrive on the left side, middle level.
- Step 16Ant Tunnel ParkIn Deep Ant Tunnel II, take2Right side · lower level
You arrive on the left side, upper level.
- Step 17The Cave of Evil Eye IIn Ant Tunnel Park, take1Left side · lower level
You arrive on the left side, upper level.
- Step 18The Cave of Evil Eye IIIn The Cave of Evil Eye I, take2Right side · lower level
You arrive on the left side, upper level.
- Step 19The Cave of Evil Eye IIIIn The Cave of Evil Eye II, take1Left side · lower level
You arrive on the right side, upper level.
- Step 20The Cave of Evil Eye IVIn The Cave of Evil Eye III, take2Right side · lower level
You arrive on the left side, upper level.
- Step 21Drake Hunting GroundIn The Cave of Evil Eye IV, take2Right side · lower level
You arrive on the left side, lower level.
- Step 22The Tunnel That Lost Light IIn Drake Hunting Ground, take2Right side · upper level
You arrive on the left side, upper level.
- In The Tunnel That Lost Light I, take2Right side · lower level
You arrive on the left side, upper level.
Maps with a portal to The Tunnel That Lost Light II (2)
Grey numbers are portals on another map: each opens that map with the portal picked out. A coloured number followed by "here" is a portal on the map above. Positions are from the game files, not tested in Classic World.

Last updated 5 Nov 2026, from game data version 779. How we gather data